Stream MP4 Videos as Virtual RTSP Cameras

Say you're building a computer vision application that processes live CCTV footage. You connect a couple of cameras, test the application, and everything works fine. Then you need to find out how it handles 50 or 100 cameras at once.
I'd rather not buy 100 CCTV cameras just to answer that question.
That got me thinking about how to simulate multiple RTSP streams without physical cameras or unreliable public RTSP links. Could a few MP4 files behave like live camera feeds?
With FFmpeg and MediaMTX, we can loop those MP4 videos and give each one its own RTSP URL. Let's start with one video, then use a Bash script to run a whole folder of them as virtual CCTV cameras.
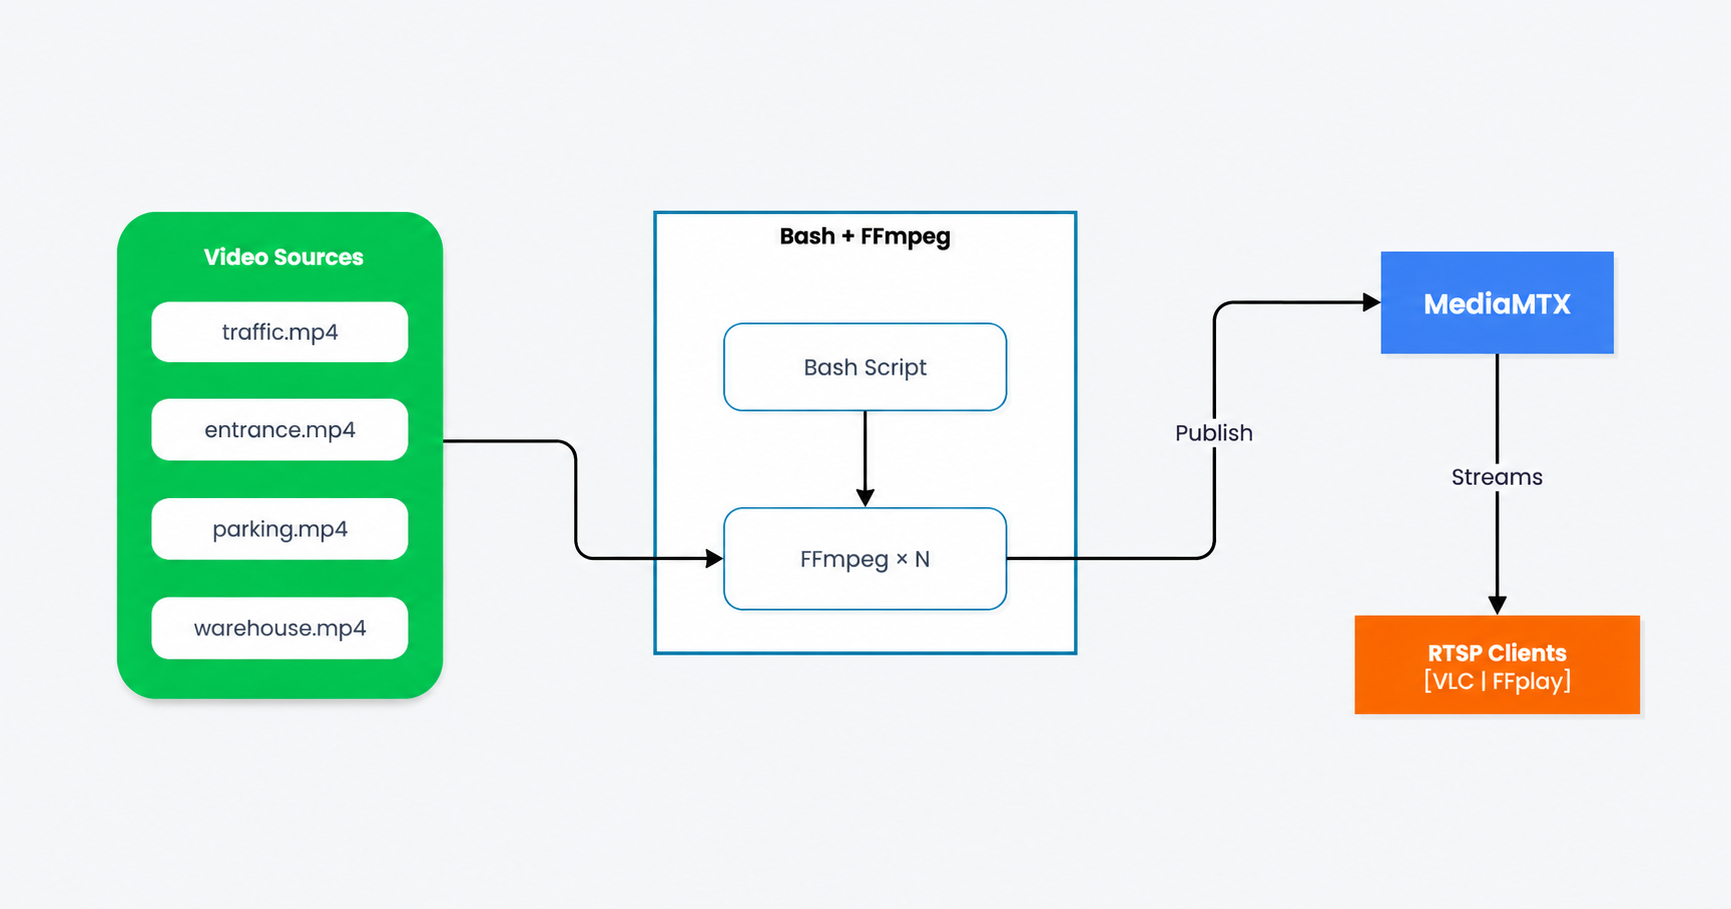
Goal
Our goal is to take a collection of video files and make them accessible as RTSP camera streams. Any RTSP-compatible client can connect to these URLs and receive video frames.
For example, consider we have three videos:
videos/
├── entrance.mp4
├── parking.mp4
└── traffic.mp4
We want to expose them as:
rtsp://localhost:8554/entrance
rtsp://localhost:8554/parking
rtsp://localhost:8554/traffic
MP4 videos eventually end but CCTV cameras are expected to keep streaming. We can loop each video indefinitely so that our virtual cameras can stream continuously.
Prerequisites
We'll use two tools:
- FFmpeg reads each video file, loops it, and publishes it as an RTSP stream.
- MediaMTX is the RTSP server that clients connect to.
We'll run MediaMTX in Docker to keep the setup simple.
The processing pipeline looks like this:
MP4 Video → FFmpeg → MediaMTX → RTSP Client
Before getting started, make sure you have:
- Docker installed and running
- FFmpeg installed on your host machine
- At least one MP4 video, preferably encoded with H.264
- VLC or FFplay for testing
You can verify FFmpeg and Docker using:
ffmpeg -version
docker --version
This article uses a Linux environment. The RTSP server will run in Docker, while FFmpeg will run on the host machine.
Setting up the RTSP server
We'll use MediaMTX, a media server that supports RTSP and several other streaming protocols.
Start it using Docker:
docker run -d \
  --name rtsp-server \
  --restart unless-stopped \
  -e MTX_RTSPTRANSPORTS=tcp \
  -p 8554:8554 \
  bluenviron/mediamtx:latest
This command starts MediaMTX in the background and exposes port 8554 for RTSP connections.
Check that the container is running:
docker ps -a --filter "name=rtsp-server"
MediaMTX is now ready to receive streams. We'll use FFmpeg to publish our videos to it.
Streaming our first video
Let's start with a single MP4 file named test.mp4:
ffmpeg -re \
  -stream_loop -1 \
  -i test.mp4 \
  -an -c:v copy \
  -f rtsp \
  -rtsp_transport tcp \
  rtsp://localhost:8554/cam_1
The options mean:
| Option | Purpose |
|---|---|
-re | Read the file at its native playback speed |
-stream_loop -1 | Repeat the video indefinitely |
-i test.mp4 | Input video file |
-an | Disable audio |
-c:v copy | Copy the existing video stream without re-encoding |
-f rtsp | Publish using RTSP |
-rtsp_transport tcp | Use TCP for the RTSP media transport |
The -c:v copy option avoids re-encoding, keeping CPU usage low. However, it requires a video codec that MediaMTX and
the RTSP client support. H.264 is a reliable starting point.
Our MP4 video is now being published as an RTSP stream:
rtsp://localhost:8554/cam_1
FFmpeg restarts the video whenever it reaches the end. Leave it running while you test the stream.
Testing the RTSP stream
Open another terminal and connect to the camera:
ffplay -rtsp_transport tcp rtsp://localhost:8554/cam_1
Alternatively, open VLC Media Player, select Media → Open Network Stream, and enter:
rtsp://localhost:8554/cam_1
If the setup is working, you'll see the MP4 video playing through RTSP in FFplay or VLC.
Simulating multiple CCTV cameras
Now that one camera is working, we can give each video in our folder its own stream. For 100 cameras, I'd rather use a small Bash script than open 100 terminals and run FFmpeg manually.
First, organize our video files:
virtual-cctv/
├── videos/
│   ├── entrance.mp4
│   ├── parking.mp4
│   ├── traffic.mp4
│   └── warehouse.mp4
└── start_cameras.sh
Create a file named start_cameras.sh:
#!/bin/bash

for video in videos/*.mp4; do
    [ -f "$video" ] || continue

    name=$(basename "$video" .mp4)

    ffmpeg -nostdin -re \
      -stream_loop -1 \
      -i "$video" \
      -an -c:v copy \
      -f rtsp -rtsp_transport tcp \
      "rtsp://localhost:8554/$name" &

    echo "Starting camera: $name"
done

wait
Run the script:
bash start_cameras.sh
The script finds every MP4 file inside the videos/ directory and launches a separate FFmpeg process for each video.
The streams run simultaneously, each using the video's filename as its camera name.
For example:
| Video file | RTSP URL |
|---|---|
| entrance.mp4 | rtsp://localhost:8554/entrance |
| parking.mp4 | rtsp://localhost:8554/parking |
| traffic.mp4 | rtsp://localhost:8554/traffic |
| warehouse.mp4 | rtsp://localhost:8554/warehouse |
The same approach works with 100 videos, assuming the system has sufficient resources.
Performance considerations
At 100 streams, your machine has to read all those files and serve the viewers. Stream copying keeps CPU usage down because FFmpeg doesn't need to decode and re-encode every frame, but disk reads, network traffic, and the resources each process uses still add up.
Video codec: H.264 is a good starting point because it is widely supported by RTSP clients.
Storage: Streaming 100 videos means reading 100 files concurrently. SSD storage can help keep disk performance consistent.
Network bandwidth: If each stream uses 2 Mbps, 100 streams generate approximately 200 Mbps of publishing traffic. Since FFmpeg and MediaMTX run on the same machine, this traffic stays local. Each remote viewer adds outgoing bandwidth requirements.
Client connections: The number of connected viewers also affects how many viewers the server can support, since each connection consumes additional server bandwidth.
CPU and memory: Even without re-encoding, running 100 separate FFmpeg processes consumes CPU and memory. Measure performance with a few streams before scaling up.
Conclusion
We can now test with multiple camera feeds without buying a room full of cameras. Each feed comes from an MP4 file, so we can use this setup to test RTSP integrations, run performance benchmarks, or experiment with video analytics.
There are plenty of things we could improve, such as automatically restarting failed streams, adding timestamps, or dynamically managing cameras. But for now, this should be more than enough to get started.